| | Painting the Razorwing Jetfighter |  |
|
|
| Author | Message |
|---|
Lord Payne
Number of posts : 671
Registration date : 2007-05-01
| | Subject: Painting the Razorwing Jetfighter Tue 16 Apr - 13:21:00 | |
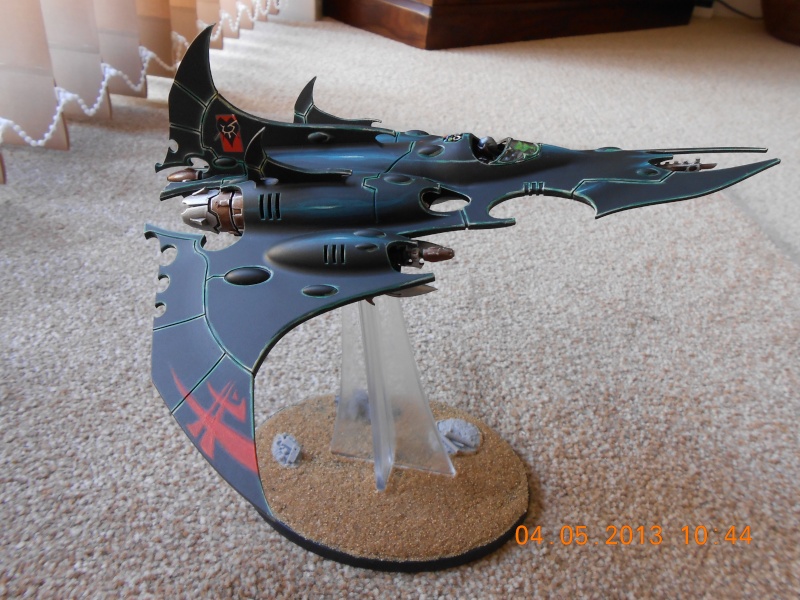
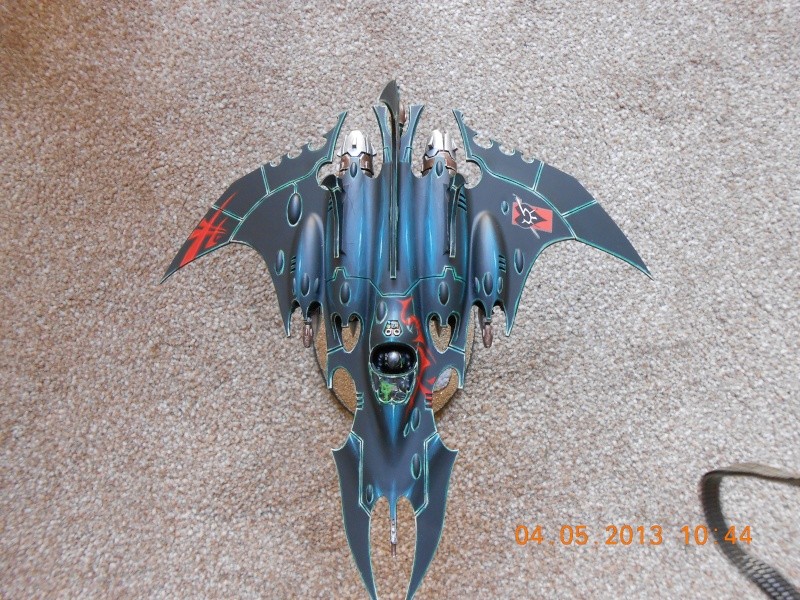
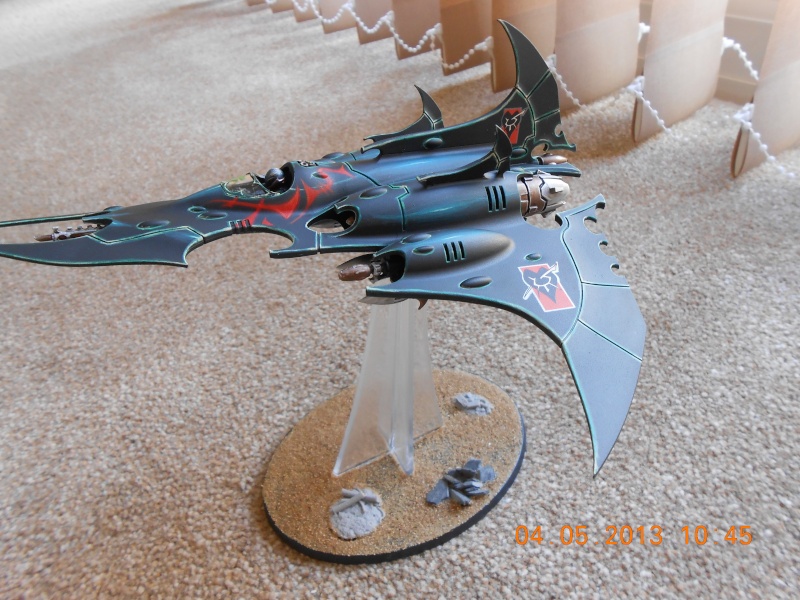
| With the new paint ranges painting the Kabal of the Black Heart consistently was problematic. Experimenting with colours has meant a mixture of new and old colours. When I have used a new colour I will show the old colours in brackets so that you can still make your own mixes. In general I have been able to get very good colour matches that are seemless.
Before starting you need the following:
Plenty of Medium
Preferably the Eavy Metal master class brushes - standard and large
Undercoat spray
I always add one part medium to all of my colour mixes no matter what I am doing. This will mean it takes more time to complete, however, it will also give you a much better finish and make blending very easy. You don't have to use medium, but for every stage I am describiing I have used one part medium.
The other thing to consider is that i use a lot of brush blending an tend to avoid dry brushing. This is not to say that you cant use dry brushing, just it is something I find tends to give a chalky effect.
Another tip to consider is the fine detail brush. I rarely use this brush as I tend to find it is a poor quality brush that creates blobs rather than smooth brush strokes. The standard brush with a little paint on it tends to make it easier to apply that small detail. The only time I ever use the fine detail brush is if the brush head is too big to fit into the area I am painting. For example - painting free-hand lines, or bottles and gems on a weapon I use the standard brush. However, painting an eye I use the fine detail brush as the standard brush would end up getting paint over the eye socket that surrounds the eye.
This is why you should plan your painting stages before you start. A mistake like this can all that hard work you have just done in a matter of seconds.
Last edited by Lord Payne on Wed 8 May - 10:38:24; edited 1 time in total | |
|
| | |
Lord Payne
Number of posts : 671
Registration date : 2007-05-01
| | Subject: Re: Painting the Razorwing Jetfighter Fri 26 Apr - 13:16:14 | |
| Step one - Foundation of the body. After spraying the undercoat of black I set a base coat of Incubi Darkness (Equal parts mix of Enchanted Blue, Dark Angels Green & Chaos Black). Apply this in 2 or 3 thin even coats rather than trying to do it in one layer. 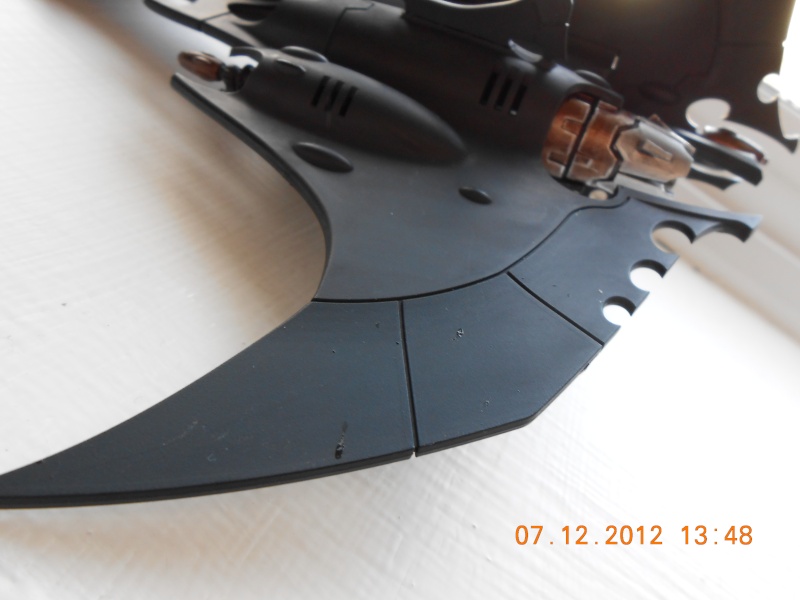
Last edited by Lord Payne on Wed 8 May - 19:30:42; edited 1 time in total | |
|
| | |
Lord Payne
Number of posts : 671
Registration date : 2007-05-01
| | Subject: Re: Painting the Razorwing Jetfighter Fri 26 Apr - 13:19:07 | |
| Step 2: After allowing the base coat to dry I applied the edge highlighting. This is made up over several layers. Layer 1 - Using the Eavy Metal Masterclass Standard brush I applied a edge highlight around most of the fighters edges, leaving a few places untouched for effect. My First highlight was Kabalite Green (Equal mix of Enchanted Blue and Dark Angels Green). Don't warry if you slip or make some mistakes, they can be cleared up later when you have completed the highlighting. 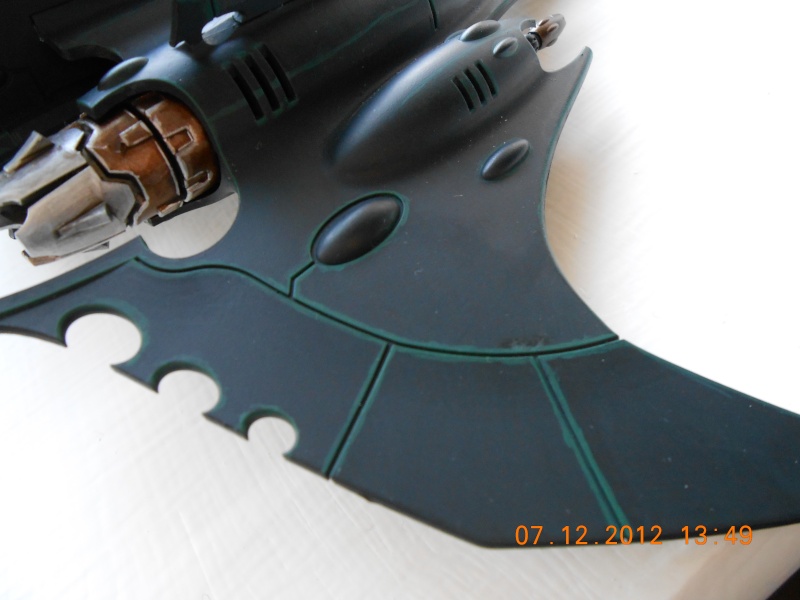 
Last edited by Lord Payne on Wed 8 May - 19:33:50; edited 1 time in total | |
|
| | |
Lord Payne
Number of posts : 671
Registration date : 2007-05-01
| | Subject: Re: Painting the Razorwing Jetfighter Tue 30 Apr - 15:41:55 | |
| Layer 2 - I built up the edge highlight by making an even thinner line over the original. In places make the highlight heavier - especially as you get to corners. The mix I used was 6:3:1 parts of Rotting Flesh, Kabalite Green and Scorpian Green. Dont worry if you make a mistake as it can be tidied up later. 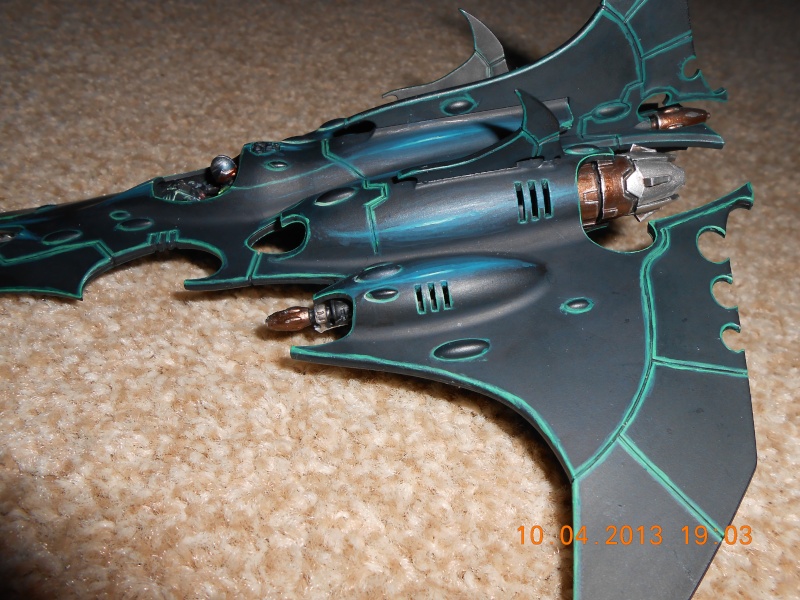
Last edited by Lord Payne on Wed 8 May - 19:35:56; edited 1 time in total | |
|
| | |
Lord Payne
Number of posts : 671
Registration date : 2007-05-01
| | Subject: Re: Painting the Razorwing Jetfighter Tue 30 Apr - 15:48:09 | |
| Layer 3 - I then applied a final edge highlight with pure Rotting Flesh. Apply this to the extreme edges in a dilute form. Then for blending allow th brush a few seconds to dry and gently stroke it along the edge away from the extreme highlight. Wash the brush immediately to avoid ruining the brush. To tidy up all of the channel grooves on the wings and around the body, dilute a wash of Badaab Black and run the brush along the channel. This will cover up any mistakes in the channel. Then mix equal parts Chaos Black and Incubi Darkness and thin it right down (2 parts water, 1 part medium). Gently apply this around the outside edge of the highlighting to straighten up the lines and any other area where you may have made mistakes. Try to avoid touching the model until the paint has dried fully. 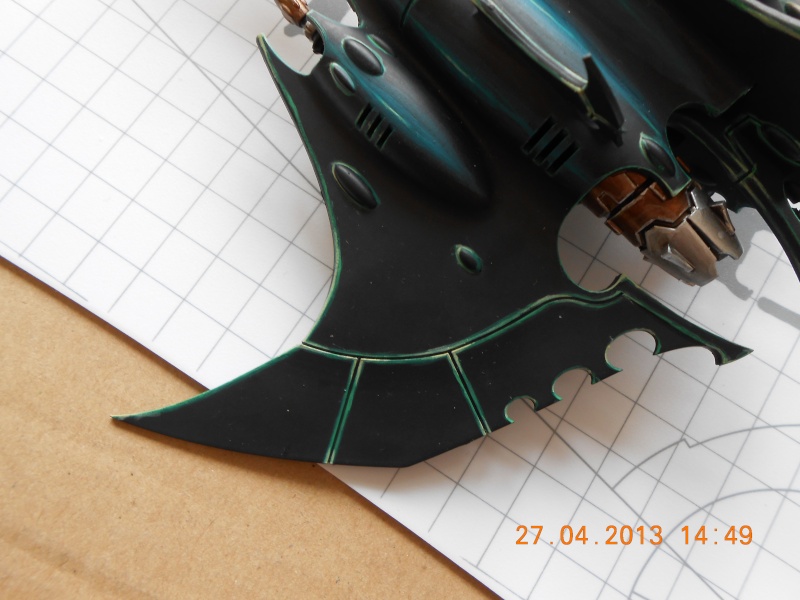 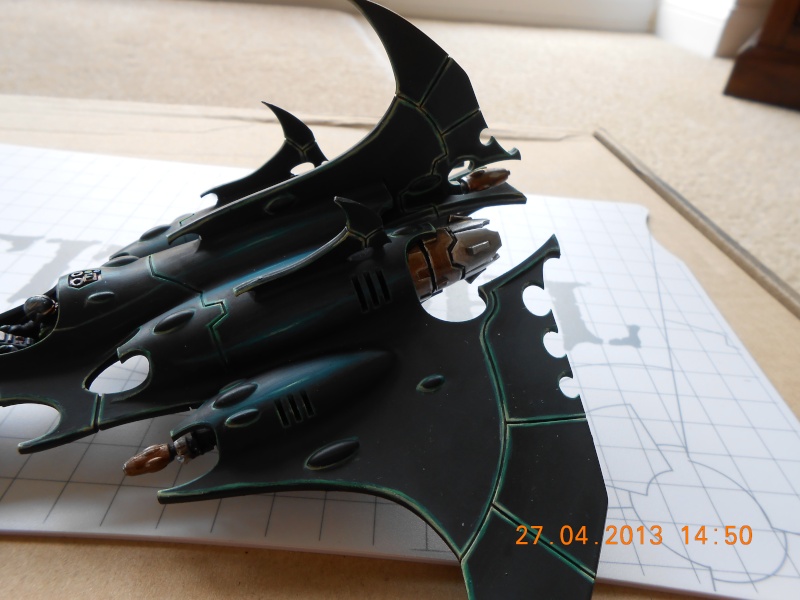
Last edited by Lord Payne on Wed 8 May - 19:39:32; edited 2 times in total | |
|
| | |
Lord Payne
Number of posts : 671
Registration date : 2007-05-01
| | Subject: Re: Painting the Razorwing Jetfighter Tue 30 Apr - 15:54:44 | |
| Engine Glow To create the engine glow you need to use a technique known as Directional lighting (or Object Source Lighting). This technique can be done in a variety of methods, for this model I used a glazing method. Making the Glaze. This is done by using the colour you wish to project the light and watering it down which ends up creating the illusion of light due to its transluscent nature. My engine body is done in Incubi Darkness so this would naturally form part of the mix. You must also bear in mind that the source of light must be the brightest part, so do not make your glaze brighter than the source of light otherwise you will lose the effect. Start by painting the wind stream effect along the engine body in gentle strokes. Use the same colours as for all of the edge highlighting described above. Dont worry about the line having a very solid look, this will be blended out over the next few stages. 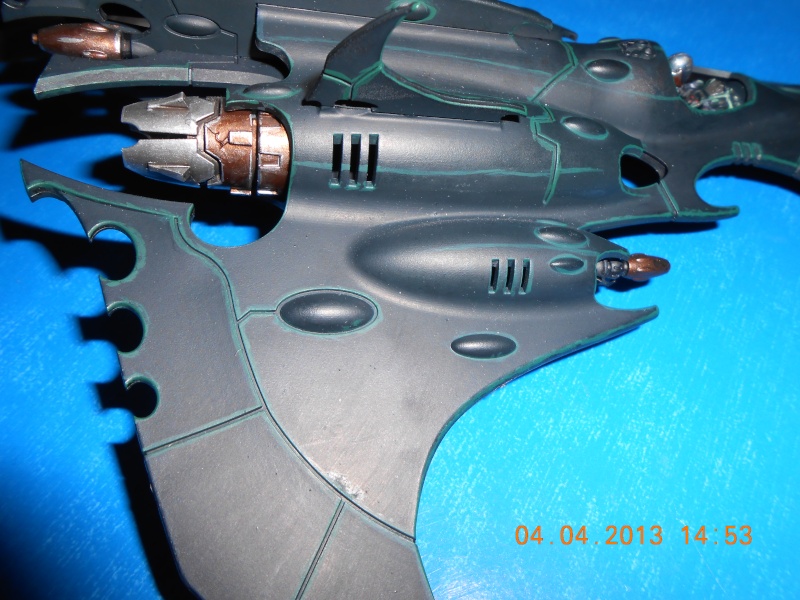
Last edited by Lord Payne on Wed 8 May - 19:41:25; edited 1 time in total | |
|
| | |
Lord Payne
Number of posts : 671
Registration date : 2007-05-01
| | Subject: Re: Painting the Razorwing Jetfighter Thu 2 May - 11:56:53 | |
| Engine Glow 2 Using about 5 parts water I mixed Incubi Darkness with Hawk Turqoise 1:1 and then 1 part medium. I brushed this over the wind stream lines very haphazardly, with it being wider near the middle of the lenght and slimmer near the ends of the stream. When it dries it will have covered a lot of the stream line but you should still be able to see the line through the glaze. Because it is very difficult to get to grips with this technique I suggest for your first few attempts that you practice on a piece of plastic that is not your actual model to get your mixes correct and confidence built up and to see how it works. Better to make a mistake on something that doesn't matter than ruin your beautifully painted model. 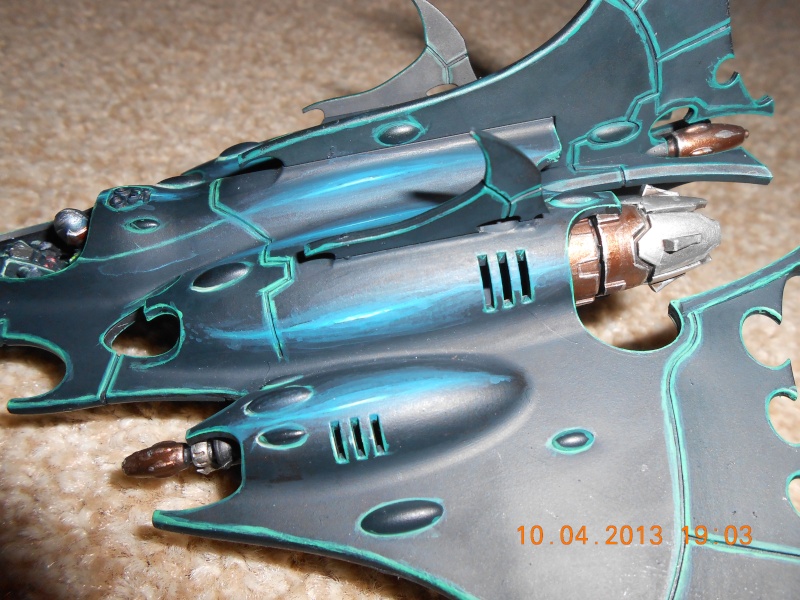
Last edited by Lord Payne on Wed 8 May - 19:42:44; edited 1 time in total | |
|
| | |
Lord Payne
Number of posts : 671
Registration date : 2007-05-01
| | Subject: Re: Painting the Razorwing Jetfighter Thu 2 May - 13:15:14 | |
| Engine Glow 3 Keeping my original glaze mix i split it into two smaller mixes. In one of the mixes I add more Incubi Darkness and a bit of medium and water in equal measure. I apply this in a few even layers further away from the source of the light. In the other mix I add more Hawk Turquoise and apply this closer to the sourece of the light. Once dry I add more of the dark and lighter colour to the respective mix and again get further away and closer to the light respectively with each mix. Finally I use a dilute mix of Hawk Turquoise and apply it right next to the source of light and allow it to dry. Once it has dried I then apply a very fine line of Rotting Flesh along the Wind Stream line to act as the source of light and make it more dominant than the glaze. If necessary you may wish to use a dilute mix of Incubi Darkness and overlap it with your outermost edge of the dark glaze to blend it in smoother. The final effect will have covered most of the original wind stream and when held in light will give the illusion of a warm heated glow coming off the engines. It's not an easy technique and it may even ruin your final model, but the only way to get it is to paint onto a finished model - so be sure you want to attempt it before you start.  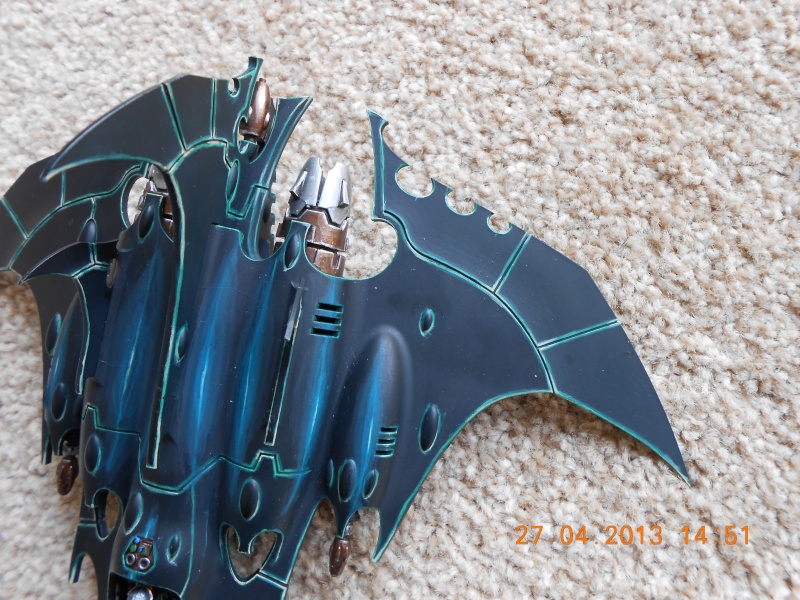
Last edited by Lord Payne on Wed 8 May - 19:45:08; edited 1 time in total | |
|
| | |
Lord Payne
Number of posts : 671
Registration date : 2007-05-01
| | Subject: Re: Painting the Razorwing Jetfighter Wed 8 May - 10:16:44 | |
| Free-Hand Motifs 1 Before painting these it is important that you make a few sketches on paper first. Once you are happy with your designs it is beneficial to copy it onto tracing paper to the full size you intend on painting it. It should be outline only. Once on the tracing paper turn it over and trace over the lines again on the other side thickening the lines up. Turn it back over to the original side. The back of the trace will be what ends up on your model. 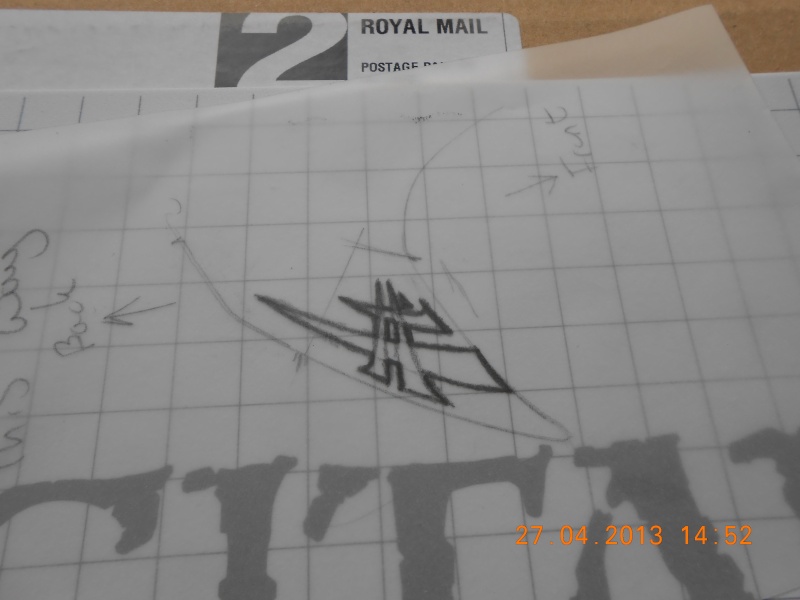
Last edited by Lord Payne on Fri 10 May - 18:40:18; edited 1 time in total | |
|
| | |
Lord Payne
Number of posts : 671
Registration date : 2007-05-01
| | Subject: Re: Painting the Razorwing Jetfighter Wed 8 May - 10:25:06 | |
| Free-Hand Motifs 2 Now carefully place the tracing paper over the part of the model you wish to decorate. Gently with a pencil go back over your outline on the tracing paper. You don't need to press that hard. DO this 2 times. When you remove the paper you will see a faint outline left behind from the pencil that you marked on the back of the tracing paper in the previous stage. You can now paint over this and fill it in. Mix up Mechrite red and scab red in equal quantities and water it down. Have a kitchen towel handy so you can rub off any mistakes. With the Heavy Metal standard brush gently apply the outline of the motif that has been traced on. It will be very faint owing to how dilute it is. If you make a mistake or slip quickly brush excess water onto the model and using your kitchen towel rub off the paint and have another go. Once you have got your outline on and are happy with it, fill in the interior with the same colour, but you can now thicken it up rather than use the dilute solution. Do this in 2 or three thin layers. **** Some parts of the model are so difficult to use tracing paper because fo the contours, however if you practice a few times on paper to the scale you want to draw with a sharp pencil, you will be able to carefully draw the design on with the same pencil. Make sure when you apply that your pencil is very sharp and that you use careful strokes - DO NOT TRY TO DO IT IN ONE GO!! If you make a mistake you can rub the mistake out, but make sure your eraser is clean of any previous use. You can then follow the procedure above to fill in the colour**** 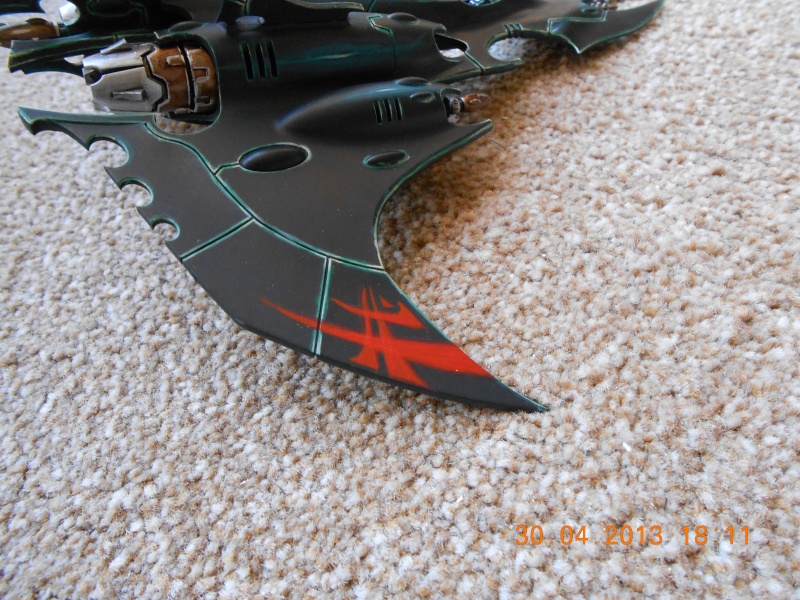
Last edited by Lord Payne on Fri 10 May - 18:42:07; edited 1 time in total | |
|
| | |
Lord Payne
Number of posts : 671
Registration date : 2007-05-01
| | Subject: Re: Painting the Razorwing Jetfighter Wed 8 May - 10:33:26 | |
| Free-Hand Motifs 3 You can now build up the colour by layering on Blood Red. Edge highlight the design with a fine line of blazing orange. If you want to accentuate the highlight another edge of 1:1 Blazing Orange and White Scar (Skull White) will do the job nicely. Once you are happy with the final design carefully use your base coat (Incubi Darkness mized with a little Chaos Black) to tidy up any tiny mistakes or sharpen the edges - use a standard brush as the fine detail brush tends to create a blob and do the opposite of what you expect. 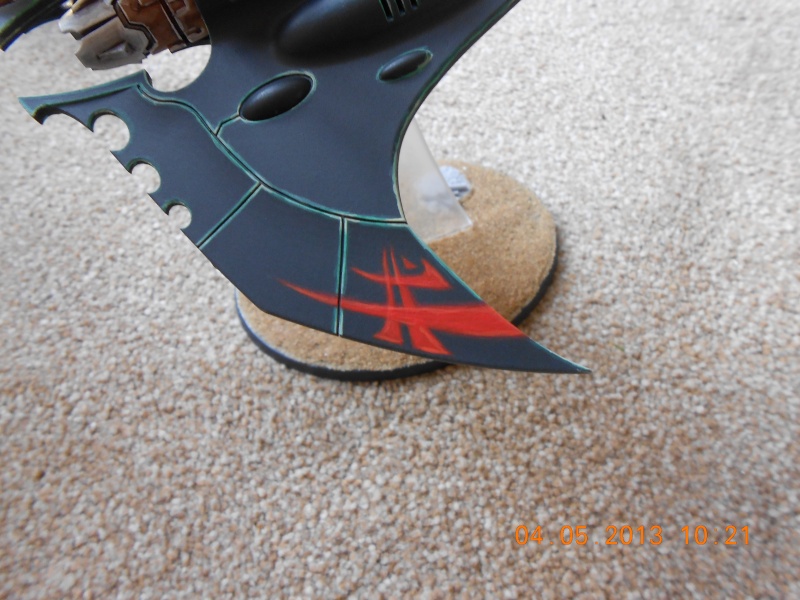 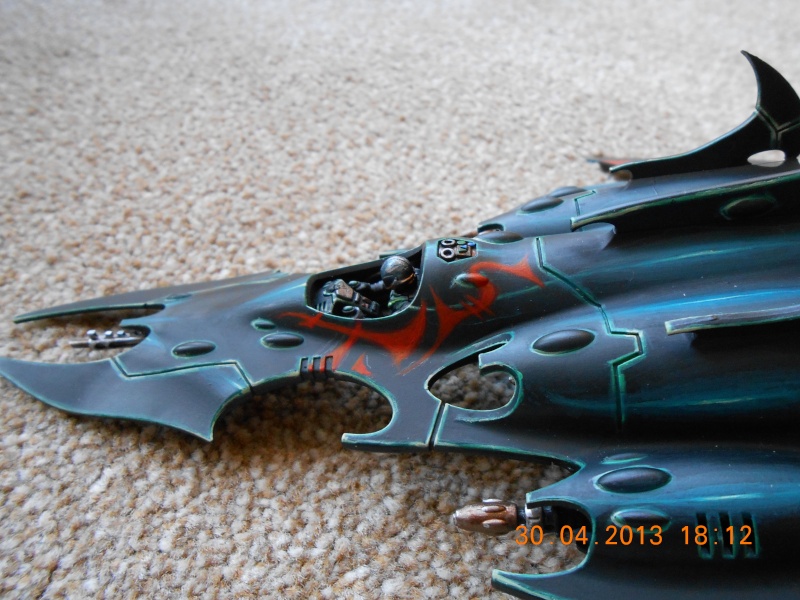 | |
|
| | |
Lord Payne
Number of posts : 671
Registration date : 2007-05-01
| | Subject: Re: Painting the Razorwing Jetfighter Fri 10 May - 18:49:36 | |
| | |
|
| | |
Sponsored content
| | Subject: Re: Painting the Razorwing Jetfighter | |
| |
|
| | |
| | Painting the Razorwing Jetfighter | |
|